Introducing Manim - A Next Level Python Visualization Package for Animation
Conveying your ideas using appropriate visualization tools to your audience is one of the prime skill every good data scientist or tutor need. When you are presenting your ideas to people from non technical background, how will you present, what will you consider for your presentation, these questions always creates dilemma among people. Everybody wish to present their mathematical views and ideas in the best way possible but it was not as easy. You cannot include high level explanation, you cannot use too much of texts, so, what is the solution? Thus the most important thing becomes efficiently presenting you complex mathematical model or views in quick and precise way. Presenting clearly from a high level rather than focusing on deep technical details. I believe good visualization skill is what we need to overcome this problem. Along with good visualization skill choice of tool also do matter.
Now the time has come where I introduce Manim.Manim is a powerful mathematical animation engine used for precise programmatic animations, designed for creating explanatory math videos. It is built on top of python. If your goal is to convey your mathematical ideas via a well defined animation Manim is the package you use. If you want to explore some works of Manim, please go and checkout the 3Blue1Brown youtube channel where Grant Sanderson uses manim to animate mathematical complexities and popular mathematical ideas.
Manim Installation
Manim is a easy to install package. Depending on your use case, you can install it in almost all environment either it be in online based ide or in your local system. For the installation I will suggest you to take reference from their installation guide on their documentation.
Quickstart
Before starting the implementation I hope you all are familiar with the any of the python IDE that you will be using. You can use any IDE you are comfortable with. We will implement some popular designs in this article. I will go over the step wise implementation of the first design only. then I will add some more examples. Let's move onto the implementation:
Example 1: Square to Circle
In this example we will animate a square into a circle. lets first import our library. The command below imports all the content of the library manim.
from manim import *
Now lets create a class that construct a scene. It uses construct() from the library and uses (Scene) as parameter,
class SquareToCircle(Scene):
    def construct(self):
Then lets create a circle and a square and set their color;
        circle = Circle()  # create a circle
        circle.set_fill(PINK, opacity=0.5)  # set color and transparency

        square = Square()  # create a square
        square.rotate(PI / 4)  # rotate a certain amount
Now lets play and transform the scene;
        self.play(Create(square))  # animate the creation of the square
        self.play(Transform(square, circle))  # interpolate the square into the circle
        self.play(FadeOut(square))  # fade out animation
This is how we create a animation of square transforming to a circle. The final output looks like this:
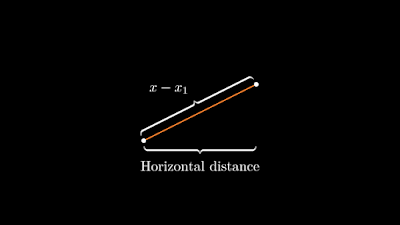
Example 2: Brace Annotation
from manim import *

class BraceAnnotation(Scene):
    def construct(self):
        dot = Dot([-2, -1, 0])
        dot2 = Dot([2, 1, 0])
        line = Line(dot.get_center(), dot2.get_center()).set_color(ORANGE)
        b1 = Brace(line)
        b1text = b1.get_text("Horizontal distance")
        b2 = Brace(line, direction=line.copy().rotate(PI / 2).get_unit_vector())
        b2text = b2.get_tex("x-x_1")
        self.add(line, dot, dot2, b1, b2, b1text, b2text)
from manim import *

class VectorArrow(Scene):
    def construct(self):
        dot = Dot(ORIGIN)
        arrow = Arrow(ORIGIN, [2, 2, 0], buff=0)
        numberplane = NumberPlane()
        origin_text = Text('(0, 0)').next_to(dot, DOWN)
        tip_text = Text('(2, 2)').next_to(arrow.get_end(), RIGHT)
        self.add(numberplane, dot, arrow, origin_text, tip_text)
from manim import *

class MovingAngle(Scene):
    def construct(self):
        rotation_center = LEFT

        theta_tracker = ValueTracker(110)
        line1 = Line(LEFT, RIGHT)
        line_moving = Line(LEFT, RIGHT)
        line_ref = line_moving.copy()
        line_moving.rotate(
            theta_tracker.get_value() * DEGREES, about_point=rotation_center
        )
        a = Angle(line1, line_moving, radius=0.5, other_angle=False)
        tex = MathTex(r"\theta").move_to(
            Angle(
                line1, line_moving, radius=0.5 + 3 * SMALL_BUFF, other_angle=False
            ).point_from_proportion(0.5)
        )

        self.add(line1, line_moving, a, tex)
        self.wait()

        line_moving.add_updater(
            lambda x: x.become(line_ref.copy()).rotate(
                theta_tracker.get_value() * DEGREES, about_point=rotation_center
            )
        )

        a.add_updater(
            lambda x: x.become(Angle(line1, line_moving, radius=0.5, other_angle=False))
        )
        tex.add_updater(
            lambda x: x.move_to(
                Angle(
                    line1, line_moving, radius=0.5 + 3 * SMALL_BUFF, other_angle=False
                ).point_from_proportion(0.5)
            )
        )

        self.play(theta_tracker.animate.set_value(40))
        self.play(theta_tracker.animate.increment_value(140))
        self.play(tex.animate.set_color(RED), run_time=0.5)
        self.play(theta_tracker.animate.set_value(350))
Output:
Example 5: Moving Frame Box
from manim import *

class MovingFrameBox(Scene):
    def construct(self):
        text=MathTex(
            "\\frac{d}{dx}f(x)g(x)=","f(x)\\frac{d}{dx}g(x)","+",
            "g(x)\\frac{d}{dx}f(x)"
        )
        self.play(Write(text))
        framebox1 = SurroundingRectangle(text[1], buff = .1)
        framebox2 = SurroundingRectangle(text[3], buff = .1)
        self.play(
            Create(framebox1),
        )
        self.wait()
        self.play(
            ReplacementTransform(framebox1,framebox2),
        )
        self.wait()
Output:
Example 5: Sine and Cosine Function Plot
from manim import *

class SinAndCosFunctionPlot(Scene):
    def construct(self):
        axes = Axes(
            x_range=[-10, 10.3, 1],
            y_range=[-1.5, 1.5, 1],
            x_length=10,
            axis_config={"color": GREEN},
            x_axis_config={
                "numbers_to_include": np.arange(-10, 10.01, 2),
                "numbers_with_elongated_ticks": np.arange(-10, 10.01, 2),
            },
            tips=False,
        )
        axes_labels = axes.get_axis_labels()
        sin_graph = axes.get_graph(lambda x: np.sin(x), color=BLUE)
        cos_graph = axes.get_graph(lambda x: np.cos(x), color=RED)

        sin_label = axes.get_graph_label(
            sin_graph, "\\sin(x)", x_val=-10, direction=UP / 2
        )
        cos_label = axes.get_graph_label(cos_graph, label="\\cos(x)")

        vert_line = axes.get_vertical_line(
            axes.i2gp(TAU, cos_graph), color=YELLOW, line_func=Line
        )
        line_label = axes.get_graph_label(
            cos_graph, "x=2\pi", x_val=TAU, direction=UR, color=WHITE
        )

        plot = VGroup(axes, sin_graph, cos_graph, vert_line)
        labels = VGroup(axes_labels, sin_label, cos_label, line_label)
        self.add(plot, labels)
Output:
These are some of the examples of manim implementation. All of these Examples are taken from the example gallery of manim documentation.
Conclusion
Good tools for your idea visualization is keen for successful presentation of your idea and Manim is one of the best approach. Use manim to bridge the gap between your idea and audience's understanding.
References
- 3Blue1 youtube channel
- Colab Notebook of Jonny Hofmeister
- Manim Community Github repo


Post a Comment