Scikit Learn Tutorial - Machine Learning with Python: A Sentiment Analysis Case Study
Today we are going to learn about Scikit-learn. Before that make sure you have knowledge of numpy, scipy, matplotlib, and pandas. If you don't know about them you can find beginners articles about them in our previous blogs. Here are the links to our blog; Numpy, Matplotlib, Pandas. If you are a python developer and looking for a robust package for machine learning implementations, Scikit-learn is the goto library for you. In this blog, you will learn about scikit learn and also we will provide you with useful resources where you can dive deep into scikit-learn. 
Scikit learn is an open-source python module that integrates a wide range of state-of-the-art machine learning algorithms for medium-scale supervised and unsupervised problems. It is at first developed by David Cournapeau as a Google Summer of Code project in 2007. After that Matthieu Brucher collaborated and commenced to use it as a part of his thesis work. And finally, in 2010, INRIA got involved and the first public release (v0.1 beta) was made. The main goal of this package is to bring machine learning to non-specialists by providing a general-purpose high-level package. The popularity of scikit learn has increased rapidly in past few years. Among many things, it includes classical learning algorithms, model evaluation, and selection tools as well as pre-processing procedures. This library is designed to work in coordination with other sets of numeric and scientific packages centered around the NumPy and SciPy libraries. Scikit-learn is built upon another library called SciPy. You must first install SciPy before using scikit-learn.
Features
Now let's talk about the features of sci-kit learn.
- Supervised and Unsupervised Learning Algorithms
Scikit-learn supports all the popular supervised learning algorithms(Linear Regression, Support Vector Machine, Decision Tree, etc.) and unsupervised learning algorithms(clustering, factor analysis, Principal Component Analysis, etc.).
- Classification
Provides various approaches to identify which category an object belongs to.
- Regression
Prediction od a continuous value associated with an object
- Clustering
Automatic grouping of similar kind of object
- Dimension Reduction
To reduce the number of random variables that need to be considered
- Model Selection
Comparing, validating, and choosing different parameters and models
- Pre-processing
Normalization and feature Extraction
Implementing Scikit Learn: A Sentiment Analysis Case Study
Before starting the implementation, you must have python and libraries like SciPy, Numpy, Matplotlib installed in your development environment. I am going to use google colab for my implementations. For this, I am gonna use the Twitter dataset which I have already cleaned the data thus only thing we need to do now is to analyze the sentiment of tweets using scikit-learn. This dataset consists of 30k tweets and their respective sentiments[1 == positive, 0==negative sentiment]. We are going to use Linear Support Vector Machine(SVM Linear) algorithm for our sentiment analysis problem.
You can find the link to the dataset here.
Now let's import the required libraries. Then let's read the data set using pandas command read_csv and also look at its structure using the head() command.
.
#import necessary modulesimport pandas as pdimport numpy as np#initializing the dataset urlurl = ("https://raw.githubusercontent.com/poshan0126/personal_site_poshan/master/twitter30k_cleaned.csv?token=AF2CEITDWBTFHM7AOZN5CNS7WXVQM")#reading the datasetdf = pd.read_csv(url)#checking the structure of dataframedf.head()
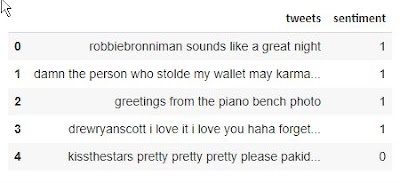
Structure of Data:

Now, we are going to use TFIDF (Term Frequency * Inverse Document Frequency) to convert our text data into numerical data so that our machine learning algorithm can create a model using that dataset. For this, we are going to import tfidf from the sklearn.feature_extraction library. Also, we need the train_test_split for splitting our dataset into training and test dataset. We will be using the LinearSVM algorithm so we need to import that as well. Finally, we also need a classification report for performance checking. Importing the required packages:
.
## using tfidf to convert text data into numeric data## train_test_split to split the dataset into train and test## LineaSVC for importing linear svm models## classification_report for performance measurementfrom sklearn.feature_extraction.text import TfidfVectorizerfrom sklearn.model_selection import train_test_splitfrom sklearn.svm import LinearSVCfrom sklearn.metrics import classification_report.
Now let's use the tfidf library, where we will be initializing the maximum features to 10000(any you want) and ngram_range to unigram and bigram.
.
## using tfidf### Using 10000 maximum features and unigram and bigram ranges.x = df['tweets']tfidf = TfidfVectorizer( max_features=10000, ngram_range=(1,2))x = tfidf.fit_transform(x)y = df['sentiment']x.shape.
The shape of x now becomes (30000, 10000) i.e. it has 30000 rows and 10000 columns. Since x is now a sparse matrix you won't be able to print x.
Now our data is prepared, we should split our dataset into train and test. Here we will use 20% of our data as a test set and the remaining as train data.
.
## Let's split the dataset into train and testx_train, x_test, y_train, y_test = train_test_split(x, y, test_size = 0.2, random_state = 0 )x_train.shape, x_test.shape.
As you can see above the shape of the train and test x is changed to ((24000, 10000), (6000, 10000)). Let's define our classifier i.e. linear SVM classifier.
.
## Defining our clasifierclassifier = LinearSVC()classifier.fit(x_train, y_train).
After we defined our classifier. Let's use this to predict the output for our test set and let's check the accuracy of this model for this data.
.
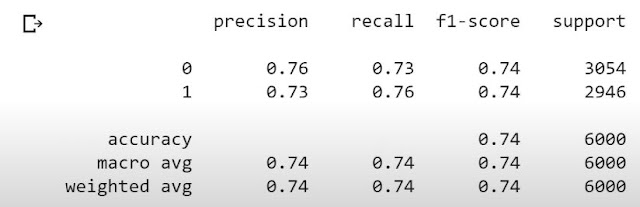
## Predicting for test sety_pred = classifier.predict(x_test)print(classification_report(y_test, y_pred)).

As you can see in the above matrix our model is highly accurate(74 %). By doing some more parameter changes and hyperparameter tuning we can improve this accuracy even much better than 74%.
Now let's go ahead and see how you can use this model to predict the sentiment of custom tweets or phrases. For that let's use the phrase ("The Jay tech is a really very good place to learn about machine learning, data science, and deep learning. I love it."). Since this is a test phrase we need to transform it using tfidf and then predict its sentiment.
.
## Using our model to predict sentiment of custom textcustom_text = ("The Jay tech is a really very good place to learn about machine learning, data science, and deep learning. I love it.")vec = tfidf.transform([custom_text])classifier.predict(vec).
As you can see the output is array([1]). Here 1 means positive sentiment i.e. our model predicted the sentiment of our given text accurately.
You can find the colab file to this model here.
Congratulations!, you have completed your first scikit-learn project. Now if you want to learn more and dive deep I will give you some useful links and resources.
Post a Comment